iphone users that plan to switch to a new device or hand over their old one to someone else often need to erase the data stored on their iphone. In this article we will give a step-by-step guide on how to do this.
First you will need to open up the settings app. Then select the option to reset and erase all content. Confirm the choice and then wait for the erasing process to finish. By following these steps you should have a successfully erased iphone.
What You Need to Know Before Erasing an iPhone
Before erasing an iPhone, there are a few important things that you need to know. Erasing your iPhone means that data, settings, and apps will be removed from the device, and your iPhone will be restored to its original factory settings.
Before taking the plunge, here are some factors that you need to consider:
- Create a backup.
- Sign out of your iCloud account.
- Know the consequences.
Creating a backup for your iPhone is essential. You can back up and restore your iPhone via iTunes or iCloud. By creating a backup of your device, you can recover your data, settings, and apps later. It’s also recommended that you sign out of your iCloud account before erasing your iPhone. This will ensure that no unauthorized access to your data or accounts is possible.
It’s also important to consider the consequences of erasing your iPhone. After the process is complete, any data that is stored locally on the device will be erased. This means that songs, photos, videos, apps, etc. will be lost if you don’t make a backup beforehand. Additionally, if you are selling your iPhone, it’s a good idea to erase it before passing it along.
Steps to Erase Your iPhone Remotely
Erasing your iPhone remotely is a quick and easy way to reset your device to factory settings and remove all personal data from your phone. Here are the simple steps you should take to erase your iPhone remotely:
Step 1: Set up the Find My iPhone Feature
Before you can erase your iPhone remotely, you must first enable the Find My iPhone feature on your device. To do this, open the Settings app on your iPhone and tap on your Apple ID at the top of the screen. Next, tap on Find My and slide the toggle next to Find My iPhone to the on position. This will enable the feature and allow you to erase your device remotely.
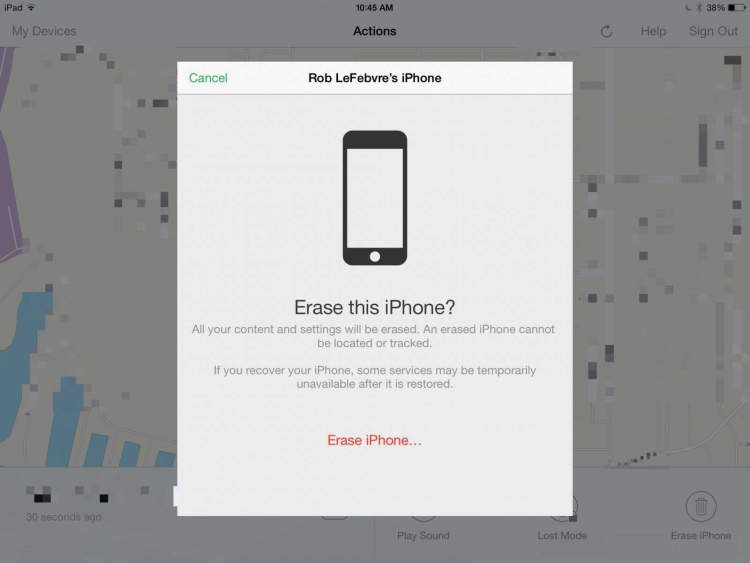
Step 2: Remotely Erase Your iPhone
Now that the Find My iPhone feature is enabled on your device, you can proceed with erasing your iPhone remotely. To do this, first open the Find My app on any other iPhone, iPad, or Mac. Once the app is open, sign in with the same Apple ID you used to enable the Find My iPhone feature on your device. Once you’ve signed in, you’ll be able to see your device on the app’s main screen.
Tap on your device, then tap on the Actions button at the bottom of the screen. On the Actions menu, tap on the Erase iPhone button. This will begin the erase process and all the data on your device will be wiped.
Step 3: Check the Erase Status
Once the erase process has begun, you’ll be able to check the status of the erase. To do this, open the Find My app again and tap on your device. At the top of the screen you should see the erase status. If the erase is still in progress, you’ll see an indication of this. Once the erase is complete, you should see a message stating that your device has been erased.
Step 4: Reset Your iPhone
Once your device has been successfully erased, you should reset it to its factory settings. To do this, open the Settings app on your iPhone and tap on General. Next, tap on Reset and then select the option to Erase All Content and Settings. This will reset your device to its original factory settings and you’ll be ready to set up your iPhone as new.
Steps to Erase Your iPhone Manually
Erasing an iPhone is not as hard as it may sound like. Here’s the step-by-step guide if you want to erase your iPhone manually.
1. Back Up Your Data
The first step when erasing your iPhone is backing up your data. Saving photos, videos, and other important files that you have stored on the phone will allow you to restore them later if you need it.
2. Disable Find My iPhone
The second step is to disable the Find My iPhone feature. This feature allows you to locate and recover a lost or stolen iPhone. To do this, go to Settings > iCloud > Find My iPhone and toggle it off.
3. Reset Your Network Settings
Reset your network settings to make sure that any connections and passwords are wiped clean from the phone. To do this, go to Settings > Reset > Reset Network Settings.
4. Erase Your iPhone
Now you can erase your iPhone. Go to Settings > Reset > Erase All Content and Settings. This will remove all the data including apps, photos, and contacts. You will also need to enter your passcode to confirm the erase.
5. Restore Your Data
Once your iPhone is erased, you can restore the data backup if you saved one. To do this, go to Settings > General > Reset > Erase All Content and Settings. You will then be able to restore the data that you backed up on your computer.
Conclusion
Erasing an iPhone can seem like a daunting task, but with the step-by-step guide provided here, even the least tech-savvy user can master it. Erasing the iPhone can also open up storage for new apps and data to be added. Once the process is complete, you will have a factory fresh device ready for a new user.
When erasing an iPhone, it is important to take the time to back up important information to avoid losing any vital data. Additionally, be aware that erasing an iPhone will remove all factory settings and any personal settings and pictures. Finally, if you’re thinking of selling or giving awayyour iPhone, always erase the device first as any of your personal information could still remain.