How to Easily Cancel Subscriptions on Your iPhone
It can be difficult to keep up with all the monthly app and subscription services we use on our phones. With multiple payment methods, accounts, and renewal dates, canceling a subscription on your iPhone can feel like an impossible task. But don’t worry — we’ve got you covered! In this article, we’ll discuss how to easily cancel subscriptions on your iPhone.
We’ll start off by explaining what subscriptions are and why you would need to cancel them. Then, we’ll give you step-by-step guidance on how to cancel a subscription directly from your iPhone. Finally, we’ll provide useful advice on how to avoid unwanted and forgotten subscriptions, so you no longer need to worry about having too many.
How to View Your Subscriptions on Your iPhone
Subscriptions can offer great convenience and value. However, it’s easy to lose track of what subscriptions you have and how much you are spending on them. Fortunately, Apple has made viewing and canceling subscriptions effortless. Follow this guide to learn how to view your subscriptions on your iPhone.
Instructions
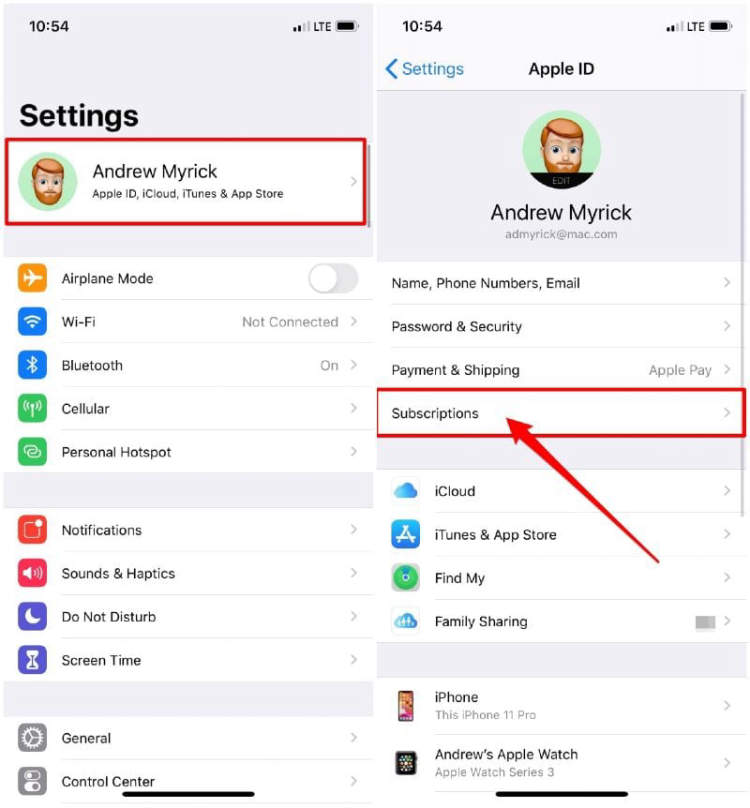
- Open the Settings app on your iPhone.
- Tap on your name at the top.
- Tap Subscriptions.
- You should now be able to view all of the active subscriptions associated with your Apple ID.
Apple will display the name and expiration date of each of your subscriptions. You can also get more information about a subscription by tapping on its icon. From here, you can learn more about the subscription, make changes, or cancel it if you no longer need it.
How to Manage Subscriptions on Your iPhone
Modern technology can help us stay organized and keep on top of everything that needs to be done. Managing subscriptions on your iPhone is no different. Keeping track of all the bills, newsletters, magazines, and streaming services can be both time-consuming and overwhelming. Thankfully, with a few simple steps, you can keep all of your subscriptions organized and in one place. Here’s how to easily manage subscriptions on your iPhone.
Step 1: Access Settings
The first step to managing your subscriptions is to open your settings tab. This can be done by pressing the settings icon on your home screen. Once you’re there, you will see several different categories. Scroll down to the “iTunes & App Stores” section and look for the “Subscriptions” option.
Step 2: Review Your Subscriptions
When you click on the “Subscriptions” button, you will see a list of all the services and apps you are currently subscribed to. This can include anything from Netflix to DropBox or Spotify. Review the list of apps and double-check the expiration date of each subscription.
Step 3: Update or Cancel Subscriptions
Once you’ve reviewed your subscriptions, look at the bottom of the list to find the “Manage” button. This will prompt you to either renew or cancel any of the subscriptions you have. If you decide to cancel or renew a subscription, the process is very simple. All you need to do is click the “Confirm” button; the subscription will automatically be updated or canceled.
Step 4: Update Your Billing Info
In some cases, your subscription may be automatically renewed each month or year. It is important to keep your billing information up-to-date to ensure your subscriptions remain active and that you are not charged for something you don’t want. To update your billing information, look for the “Manage Payments” button located near the bottom of the Subscriptions page. You will now be able to add, edit, and remove your payment options for all of your subscriptions from this page.
How to Cancel a Subscription on Your iPhone
Subscriptions are a great way to access apps, services, and content. However, if you no longer need or want a subscription, it’s important to know how to cancel it. Here’s how to easily cancel subscriptions on your iPhone.
Step 1: Open the Settings App
To access subscriptions on your iPhone, launch the Settings app from your Home Screen. Tap your profile icon in the top right of the screen and then select “iTunes & App Store” from the list.
Step 2: Navigate to Your Subscriptions
You’ll find your subscriptions on the Account page. Underneath your Apple ID, you’ll see a list that includes “Subscriptions”. Tap this and then select the subscription you’d like to manage.
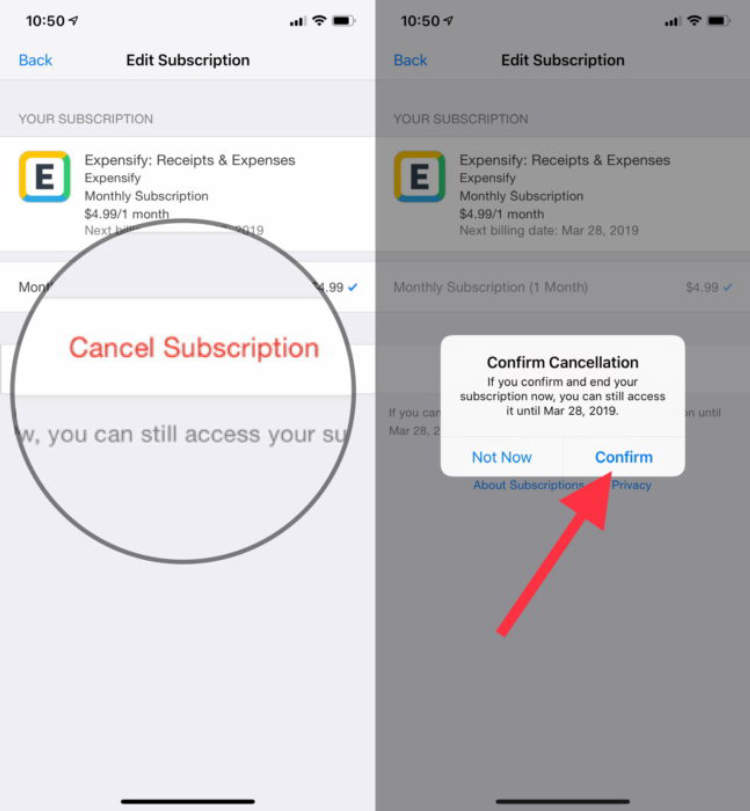
Step 3: Cancel the Subscription
Once you open your subscription, you’ll have the choice to cancel or modify it. If you cancel it, the subscription will end at the end of the current billing period. Remember, don’t delete the app until you have successfully cancelled the subscription.
Tips for Cancelling a Subscription on Your iPhone
- You may have more than one Apple ID associated with a subscription. Make sure you are logged into the correct account before attempting to make changes.
- Subscriptions may renew automatically unless you cancel them. Don’t forget to cancel any unused or unwanted subscriptions in order to save money.
- Certain apps and services must be managed through the service provider, not via the App Store. For example, if you purchased a subscription from Netflix, you’ll need to manage the subscription through Netflix and can’t do it on your iPhone.
Cancelling subscriptions on your iPhone is a straightforward process. Once you’ve cancelled, be sure to review the active subscriptions regularly so that you’re only paying for the services you need.
Conclusion
Subscribing to services on your iPhone is convenient and easy. However, if you no longer wish to use those services, canceling your subscription can be done quickly and easily. All you need to do is go to the Settings app, tap on your Apple ID, select Subscriptions, and you will be presented with a list of all active subscriptions. From there, simply select the ones you no longer require and select the “Cancel Subscription” to complete the process.
Canceling a subscription is a quick and simple process that can save you time and money. Taking the time to unsubscribe from services you’re not using can make your life easier, as you’ll no longer be wasting money on services you no longer require.
Post a Comment for "How to Easily Cancel Subscriptions on Your iPhone"